In this post, I will explain how to start our application on start up i.e. on BOOT_COMPLETED.
Let's take a look
Create a new application with the following details:
Now go to Package Explorer, create a Service:
To create a Service, right click on our project:
RunAppOnBoot.
Select New --> Other... --> From Wizard Select Android Object
Select Service --> Give Class Name --> Check Enabled
Click Next --> Finish
You will get a new file, MyService.java
Normally Services are used to perform the background task. It keeps running in the device even the activity is destroyed.
We need a BroadcastReceiver to receive the BOOT_COMPLETED event.
Perform the steps as mentioned above. Instead of Service, select Broadcast Receiver. Check Enabled and Exported.
You will get another new file i.e. MyReceiver.java
Now Go to AndroidManifest.xml
Do the following changes:
AndroidManifest.xml
<?xml version="1.0" encoding="utf-8"?>
<manifest xmlns:android="http://schemas.android.com/apk/res/android"
package="com.samples.runapponboot"
android:versionCode="1"
android:versionName="1.0" >
<uses-sdk
android:minSdkVersion="8"
android:targetSdkVersion="17" />
<uses-permission android:name="android.permission.RECEIVE_BOOT_COMPLETED"/>
<application
android:allowBackup="true"
android:icon="@drawable/ic_launcher"
android:label="@string/app_name"
android:theme="@style/AppTheme" >
<activity
android:name="com.samples.runapponboot.RunOnBootActivity"
android:label="@string/app_name" >
</activity>
<service
android:name="com.samples.runapponboot.MyService"
android:enabled="true" >
</service>
<receiver
android:name="com.samples.runapponboot.MyReceiver"
android:enabled="true"
android:exported="true" >
<intent-filter>
<action android:name="android.intent.action.BOOT_COMPLETED" />
</intent-filter>
</receiver>
</application>
</manifest>
MyService.java
package com.samples.runapponboot;
import android.app.Service;
import android.content.Intent;
import android.content.IntentFilter;
import android.os.IBinder;
import android.util.Log;
public class MyService extends Service {
// Broadcast Receiver
private MyReceiver mMyReceiver;
// Intent Filter to Receive BOOT_COMPLETED
private IntentFilter mIntentFilter;
public MyService() {
}
@Override
public void onCreate() {
// Register MyReciever to Receive BOOT_COMPLETED
try {
mMyReceiver = new MyReceiver();
mIntentFilter = new IntentFilter(Intent.ACTION_BOOT_COMPLETED);
registerReceiver(mMyReceiver, mIntentFilter);
} catch (Exception e) {
Log.e("", e.getMessage());
}
}
@Override
public void onDestroy() {
super.onDestroy();
if (mMyReceiver != null) {
unregisterReceiver(mMyReceiver);
}
}
@Override
public IBinder onBind(Intent intent) {
// TODO: Return the communication channel to the service.
throw new UnsupportedOperationException("Not yet implemented");
}
}
MyReceiver.java
package com.samples.runapponboot;
import android.content.BroadcastReceiver;
import android.content.Context;
import android.content.Intent;
import android.util.Log;
public class MyReceiver extends BroadcastReceiver {
// Intent for RunOnBootActivity
private Intent mRunOnBootIn;
public MyReceiver() {
}
@Override
public void onReceive(Context context, Intent intent) {
try {
mRunOnBootIn = new Intent(context, RunOnBootActivity.class);
mRunOnBootIn.setFlags(Intent.FLAG_ACTIVITY_NEW_TASK);
context.startActivity(mRunOnBootIn);
} catch (Exception e) {
Log.e("MyReceiver: inReceive()", e.getMessage());
}
}
}
activity_run_on_boot.xml
<RelativeLayout xmlns:android="http://schemas.android.com/apk/res/android"
xmlns:tools="http://schemas.android.com/tools"
android:layout_width="match_parent"
android:layout_height="match_parent"
android:paddingBottom="@dimen/activity_vertical_margin"
android:paddingLeft="@dimen/activity_horizontal_margin"
android:paddingRight="@dimen/activity_horizontal_margin"
android:paddingTop="@dimen/activity_vertical_margin"
tools:context=".RunOnBootActivity" >
<TextView
android:layout_width="wrap_content"
android:layout_height="wrap_content"
android:text="@string/hello_world" />
</RelativeLayout>
It will make the application run at the device start.
This post will explain with an example how to receive the Screen On event.
Firstly create an application with the following details:
activity_screen.xml
<RelativeLayout xmlns:android="http://schemas.android.com/apk/res/android"
xmlns:tools="http://schemas.android.com/tools"
android:layout_width="match_parent"
android:layout_height="match_parent"
android:paddingBottom="@dimen/activity_vertical_margin"
android:paddingLeft="@dimen/activity_horizontal_margin"
android:paddingRight="@dimen/activity_horizontal_margin"
android:paddingTop="@dimen/activity_vertical_margin"
tools:context=".ScreenActivity" >
<TextView
android:layout_width="wrap_content"
android:layout_height="wrap_content"
android:text="@string/hello_world" />
</RelativeLayout>
ScreenActivity.java
package com.samples.screenonreceive;
import android.os.Bundle;
import android.app.Activity;
import android.content.BroadcastReceiver;
import android.content.Context;
import android.content.Intent;
import android.content.IntentFilter;
import android.view.Menu;
import android.widget.Toast;
public class ScreenActivity extends Activity {
// Broadcast Receiver to Screen On
private BroadcastScreenReceiver mBroadcastScreenReceiver;
// Specify that the Application should receive Screen On
private IntentFilter mIntentFilter;
@Override
protected void onCreate(Bundle savedInstanceState) {
super.onCreate(savedInstanceState);
setContentView(R.layout.activity_screen);
// Register
mBroadcastScreenReceiver = new BroadcastScreenReceiver();
mIntentFilter = new IntentFilter(Intent.ACTION_SCREEN_ON);
registerReceiver(mBroadcastScreenReceiver, mIntentFilter);
}
@Override
public boolean onCreateOptionsMenu(Menu menu) {
// Inflate the menu; this adds items to the action bar if it is present.
getMenuInflater().inflate(R.menu.screen, menu);
return true;
}
@Override
public void onDestroy() {
super.onDestroy();
// Unregister
if (mBroadcastScreenReceiver != null) {
unregisterReceiver(mBroadcastScreenReceiver);
}
}
/**
* Broadcast Receiver to Screen ON
* @author Tanvi Surve
*
*/
private class BroadcastScreenReceiver extends BroadcastReceiver {
@Override
public void onReceive(Context context, Intent intent) {
// Make this Toast appear on Screen On
Toast.makeText(getApplicationContext(), "Screen is ON", Toast.LENGTH_LONG).show();
}
}
}
Run the application:
Use the highlighted button on the emulator to make the screen ON and OFF. On the Screen ON, you will get a Message as "Screen is ON".
In this post, I will show how to display Contacts in an AutoCompleteTextView. Now create a new Android Application with the following details:
Activity: activity_show_contacts.xml
<!-- LinearLayout so that dragged Components will be postioned depending upon the position of the other Components -->
<LinearLayout xmlns:android="http://schemas.android.com/apk/res/android"
xmlns:tools="http://schemas.android.com/tools"
android:id="@+id/ll_ShowContactsMain"
android:layout_width="match_parent"
android:layout_height="match_parent"
android:gravity="center_horizontal"
android:orientation="vertical"
android:paddingBottom="@dimen/activity_vertical_margin"
android:paddingLeft="@dimen/activity_horizontal_margin"
android:paddingRight="@dimen/activity_horizontal_margin"
android:paddingTop="@dimen/activity_vertical_margin"
tools:context=".ShowContactsActivity" >
<!-- The Contact's Display Names will get displayed in the AutoCompleteTextView upon typing into it. -->
<!-- Property "android:drawableRight" will show the specified icon to the Right side of the AutoCompleteTextView -->
<AutoCompleteTextView
android:id="@+id/at_Contacts"
android:layout_width="match_parent"
android:layout_height="55dp"
android:drawableRight="@drawable/ic_finder"
android:ems="10"
android:singleLine="true"
android:completionThreshold="1" >
<!-- On the Activity Start, focus will be on the AutoCompleteTextView -->
<requestFocus />
</AutoCompleteTextView>
</LinearLayout>
XML file to display Contact Name in an AutoCompleteTextView: single_contact.xml
<?xml version="1.0" encoding="utf-8"?>
<LinearLayout xmlns:android="http://schemas.android.com/apk/res/android"
android:id="@+id/ll_SingleContactMain"
android:layout_width="match_parent"
android:layout_height="40dp"
android:gravity="center_vertical"
android:orientation="horizontal"
android:layout_margin="5dp" >
<TextView
android:id="@+id/tv_ContactName"
android:layout_width="match_parent"
android:layout_height="wrap_content"
android:text="@string/sample_text"
android:textColor="@android:color/black" />
</LinearLayout>
ShowContactsActivity.java
package com.samples.accesscontacts;
import java.util.ArrayList;
import java.util.List;
import android.os.Bundle;
import android.provider.ContactsContract;
import android.app.Activity;
import android.database.Cursor;
import android.util.Log;
import android.view.Menu;
import android.widget.ArrayAdapter;
import android.widget.AutoCompleteTextView;
public class ShowContactsActivity extends Activity {
// AutoCompleteTextView: Need to create an Object in order to Access it.
private AutoCompleteTextView mContactsAt;
@Override
protected void onCreate(Bundle savedInstanceState) {
super.onCreate(savedInstanceState);
setContentView(R.layout.activity_show_contacts);
// Initialize AutoCompleteTextView object So that it can access at_Contacts
mContactsAt = (AutoCompleteTextView) findViewById(R.id.at_Contacts);
// Load the Contact Name from List into the AutoCompleteTextView
mContactsAt.setAdapter(new ArrayAdapter<String>(getApplicationContext(), R.layout.single_contact, R.id.tv_ContactName, getAllContactNames()));
}
@Override
public boolean onCreateOptionsMenu(Menu menu) {
// Inflate the menu; this adds items to the action bar if it is present.
getMenuInflater().inflate(R.menu.show_contacts, menu);
return true;
}
/**
* Get All the Contact Names
* @return
*/
private List<String> getAllContactNames() {
List<String> lContactNamesList = new ArrayList<String>();
try {
// Get all Contacts
Cursor lPeople = getContentResolver().query(ContactsContract.Contacts.CONTENT_URI, null, null, null, null);
if (lPeople != null) {
while (lPeople.moveToNext()) {
// Add Contact's Name into the List
lContactNamesList.add(lPeople.getString(lPeople.getColumnIndex(ContactsContract.Contacts.DISPLAY_NAME)));
}
}
} catch (NullPointerException e) {
Log.e("getAllContactNames()", e.getMessage());
}
return lContactNamesList;
}
}
Add following into the manifest file to all the application read Contacts from the phone:
<uses-permission android:name="android.permission.READ_CONTACTS"/>
Add some sample contacts in the emulator.
Run the application:
This post will discuss how to add a ListView.
Create a New Application.
Go to Palette. Select the Composite section.
Drag ListView component on to the UI design.
Right click on the ListView dragged on the UI design.
Edit the ID. Give it the name lv_Items.
activity_show_list.xml
<RelativeLayout xmlns:android="http://schemas.android.com/apk/res/android"
xmlns:tools="http://schemas.android.com/tools"
android:layout_width="match_parent"
android:layout_height="match_parent"
tools:context=".ShowListActivity" >
<ListView
android:id="@+id/lv_Items"
android:layout_width="match_parent"
android:layout_height="wrap_content"
android:layout_alignParentLeft="true"
android:layout_alignParentTop="true" >
</ListView>
</RelativeLayout>
Add new XML file. See the following code:
list_item.xml
<?xml version="1.0" encoding="utf-8"?>
<LinearLayout xmlns:android="http://schemas.android.com/apk/res/android"
android:layout_width="match_parent"
android:layout_height="40dp"
android:gravity="center_vertical"
android:orientation="horizontal" >
<TextView
android:id="@+id/tv_Item"
android:layout_width="wrap_content"
android:layout_height="wrap_content"
android:textColor="@android:color/black" />
</LinearLayout>
Go to Package Explorer --> Expand Project ListViewDemo --> Expand src --> Expand the package com.samples.listviewdemo
--> Open the ShowListActivity.java
package com.samples.listviewdemo;
import java.util.ArrayList;
import java.util.List;
import android.os.Bundle;
import android.app.Activity;
import android.util.Log;
import android.view.Menu;
import android.widget.ArrayAdapter;
import android.widget.ListView;
public class ShowListActivity extends Activity {
// ListView to show the Items
private ListView lv_Items;
@Override
protected void onCreate(Bundle savedInstanceState) {
super.onCreate(savedInstanceState);
setContentView(R.layout.activity_show_list);
// Initialize ListView
lv_Items = (ListView) findViewById(R.id.lv_Items);
lv_Items.setAdapter(new ArrayAdapter<String>(getApplicationContext(), R.layout.list_item, R.id.tv_Item, getItems()));
}
@Override
public boolean onCreateOptionsMenu(Menu menu) {
// Inflate the menu; this adds items to the action bar if it is present.
getMenuInflater().inflate(R.menu.activity_show_list, menu);
return true;
}
private List<String> getItems() {
List<String> ls_Items = new ArrayList<String>();
try {
ls_Items.add("Apple");
ls_Items.add("Orange");
ls_Items.add("Mango");
} catch (Exception e) {
Log.e("getItems()", e.getMessage());
}
return ls_Items;
}
}
Run the application.
In this post, I will demonstrate AutoCompleteTextView.
In AutoCompleteTextView, when we type something , we get the suggestions matching the text we entered.
Let's get started.
Create a New Android Application.
If you want to change the application name, go to Package Explorer --> Expand AutoCompleteTextViewDemo --> Expand res --> Expand values --> Open strings.xml
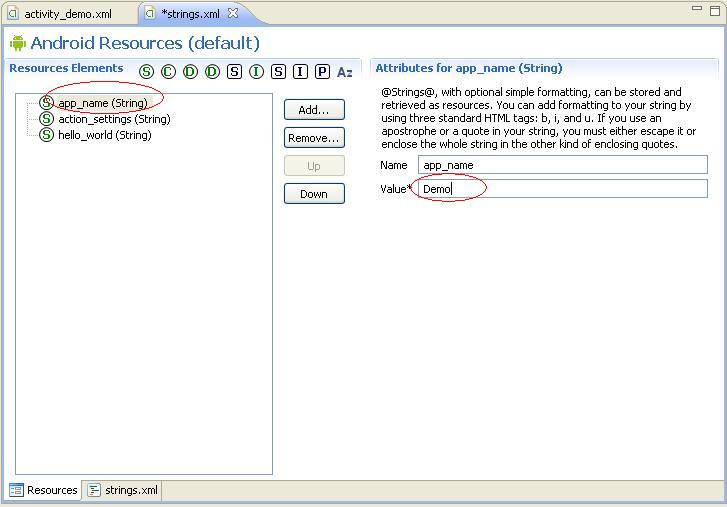
Change the app_name as mentioned in the below diagram. Save the file.
Drag one AutoCompleteTextView from the palette on to the UI. Set its Text and ID. In this case, it is at_Input.
Right click on the AutoCompleteTextView. Select Layout Width --> Other...
Give the value 0dp.
It will automatically add android:layout_weight="1" in the XML.
activity_demo.xml
<LinearLayout xmlns:android="http://schemas.android.com/apk/res/android"
xmlns:tools="http://schemas.android.com/tools"
android:layout_width="match_parent"
android:layout_height="match_parent"
android:paddingBottom="@dimen/activity_vertical_margin"
android:paddingLeft="@dimen/activity_horizontal_margin"
android:paddingRight="@dimen/activity_horizontal_margin"
android:paddingTop="@dimen/activity_vertical_margin"
tools:context=".DemoActivity" >
<AutoCompleteTextView
android:id="@+id/at_Input"
android:layout_width="0dp"
android:layout_height="wrap_content"
android:layout_weight="1"
android:ems="10"
android:completionThreshold="1" >
<requestFocus />
</AutoCompleteTextView>
</LinearLayout>
In Package Explorer, go to layout folder. Right click on it. Select New --> Android XML File. Give File name.
Click Next. Then Finish.
Drag a text view on our new UI. Give it name tv_Item.
list_item.xml
<?xml version="1.0" encoding="utf-8"?>
<LinearLayout xmlns:android="http://schemas.android.com/apk/res/android"
android:layout_width="match_parent"
android:layout_height="match_parent"
android:orientation="vertical" >
<TextView
android:id="@+id/tv_Item"
android:layout_width="wrap_content"
android:layout_height="wrap_content"
android:textColor="@android:color/black" />
</LinearLayout>
Go to Package Explorer --> Expand the AutoCompleteTextViewDemo --> Expand src --> Expand com.samples.autocompletetextviewdemo
Open DemoActivity.java
package com.samples.autocompletetextviewdemo;
import java.util.ArrayList;
import java.util.List;
import android.os.Bundle;
import android.app.Activity;
import android.util.Log;
import android.view.Menu;
import android.widget.ArrayAdapter;
import android.widget.AutoCompleteTextView;
public class DemoActivity extends Activity {
// AutoComplete TextView
private AutoCompleteTextView mInputAT;
@Override
protected void onCreate(Bundle savedInstanceState) {
super.onCreate(savedInstanceState);
setContentView(R.layout.activity_demo);
// Load Values
loadValues();
}
@Override
public boolean onCreateOptionsMenu(Menu menu) {
// Inflate the menu; this adds items to the action bar if it is present.
getMenuInflater().inflate(R.menu.demo, menu);
return true;
}
/** Load values into the AutoCompleteTextView */
private void loadValues() {
try {
List<String> mValuesList = new ArrayList<String>();
mValuesList.add("Item 1");
mValuesList.add("Item 2");
mValuesList.add("Item 3");
mValuesList.add("Item 4");
mValuesList.add("Item 5");
mInputAT = (AutoCompleteTextView) findViewById(R.id.at_Input);
mInputAT.setAdapter(new ArrayAdapter<String>(getApplicationContext(), R.layout.list_item, R.id.tv_Item, mValuesList));
} catch (Exception e) {
Log.e("Demo", e.getMessage());
}
}
}
Run the application.
In this post, I will create a simple Login application. This post will give you a brief idea about how to develop an application which handles user interactions.
User will enter login credentials and after validating the application will generate a message. The username and password will be validated against constant values "admin" and "admin".
Let's start with this:
As discussed in the first post, create one Application with the following details:
Now look at your eclipse window carefully.
You will notice different windows like Package Explorer, Pallet, Outline, Console, LogCat etc. These are very important things to notice while developing an android application
Take a look at Palette. There are few sections like Form Widgets, Text Fields, Layouts and more.
Each section contains different components which can be used to create user interfaces.
Going back to our application, you will notice "Hello world!" text on our app window (similar to the example in the first post). It is a TextView. It used to display a static text just like labels.
Delete the TextView.
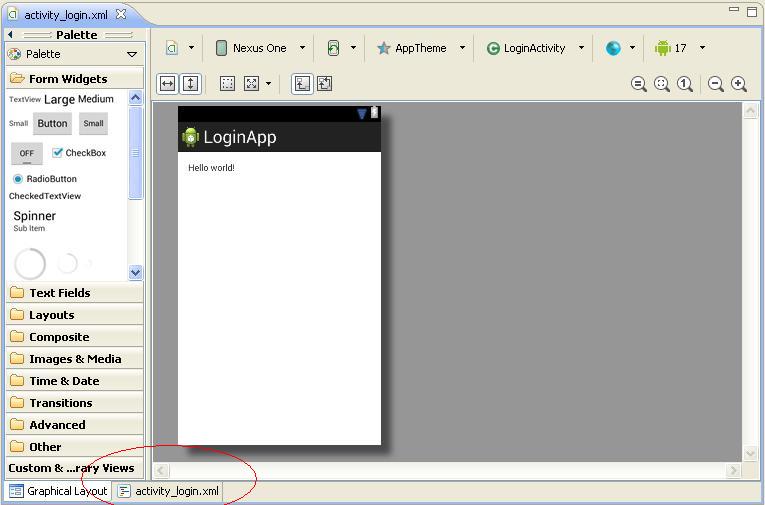
There are two tabs: Graphical Layout and activity_login.xml.
Open activity_login.xml. You will find XML code which contains RelativeLayout.
There are different layouts available in android like Linear Layout, Table Layout, Grid Layout etc. which forms the base or the other components.
Now, again go back to Graphical Layout, go to Form Widgets and drag one TextView on to the UI.
Right click on the TextView which we have dragged on our UI, Select Edit Text...
You will be prompted with the following window:
Select New String...
Specify New R. string. and String as mentioned in the image. New R. string is similar to the name of the variable and String is its value.
Click OK. You will get a new String which will be used to display in our TextView.
Click OK on the Resource Chooser window.
Right click on the "Username" TextView. Select Edit ID... Give the desired name to the TextiVew. I have given the name as tv_Username.
Drag an Edit Text from the Palette's Text Fields section. If you see, there are different types of edit texts available. Drag the one which is highlighted in below image.
Similarly set the text (blank) and id properties.
Now add one more TextView and EditText. This time select the Password edit text instead of normal one form the Palette's Text Fields section.
Add Button from the Form widgets section. Set its ID and text properties.
Add one more TextView at the bottom to display the messages for login status.
activity_login.xml
<RelativeLayout xmlns:android="http://schemas.android.com/apk/res/android"
xmlns:tools="http://schemas.android.com/tools"
android:layout_width="match_parent"
android:layout_height="match_parent"
android:paddingBottom="@dimen/activity_vertical_margin"
android:paddingLeft="@dimen/activity_horizontal_margin"
android:paddingRight="@dimen/activity_horizontal_margin"
android:paddingTop="@dimen/activity_vertical_margin"
tools:context=".LoginActivity" >
<TextView
android:id="@+id/tv_Username"
android:layout_width="wrap_content"
android:layout_height="wrap_content"
android:layout_alignParentLeft="true"
android:layout_alignParentTop="true"
android:layout_marginLeft="18dp"
android:layout_marginTop="15dp"
android:text="@string/username_text" />
<EditText
android:id="@+id/et_Username"
android:layout_width="wrap_content"
android:layout_height="wrap_content"
android:layout_alignBaseline="@+id/tv_Username"
android:layout_alignBottom="@+id/tv_Username"
android:layout_marginLeft="30dp"
android:layout_toRightOf="@+id/tv_Username"
android:ems="10" >
<requestFocus />
</EditText>
<TextView
android:id="@+id/tv_Password"
android:layout_width="wrap_content"
android:layout_height="wrap_content"
android:layout_alignLeft="@+id/tv_Username"
android:layout_below="@+id/et_Username"
android:layout_marginTop="47dp"
android:text="@string/password_text" />
<EditText
android:id="@+id/et_Password"
android:layout_width="wrap_content"
android:layout_height="wrap_content"
android:layout_alignBaseline="@+id/tv_Password"
android:layout_alignBottom="@+id/tv_Password"
android:layout_alignLeft="@+id/et_Username"
android:ems="10"
android:inputType="textPassword" />
<Button
android:id="@+id/bt_SignIn"
android:layout_width="wrap_content"
android:layout_height="wrap_content"
android:layout_alignRight="@+id/et_Password"
android:layout_below="@+id/et_Password"
android:layout_marginTop="34dp"
android:text="@string/signin_text" />
</RelativeLayout>
Go to Package explorer --> Expand the LoginApp --> src --> Package 'com.samples.loginapp' --> Open LoginActivity.java
Type the following code:
package com.samples.loginapp;
import android.os.Bundle;
import android.app.Activity;
import android.view.Menu;
import android.view.View;
import android.view.View.OnClickListener;
import android.widget.Button;
import android.widget.EditText;
import android.widget.TextView;
public class LoginActivity extends Activity {
// User name
private EditText et_Username;
// Password
private EditText et_Password;
// Sign In
private Button bt_SignIn;
// Message
private TextView tv_Message;
@Override
protected void onCreate(Bundle savedInstanceState) {
super.onCreate(savedInstanceState);
setContentView(R.layout.activity_login);
// Initialization
et_Username = (EditText) findViewById(R.id.et_Username);
et_Password = (EditText) findViewById(R.id.et_Password);
bt_SignIn = (Button) findViewById(R.id.bt_SignIn);
tv_Message = (TextView) findViewById(R.id.tv_Message);
bt_SignIn.setOnClickListener(new OnClickListener() {
@Override
public void onClick(View view) {
// Stores User name
String username = String.valueOf(et_Username.getText());
// Stores Password
String password = String.valueOf(et_Password.getText());
// Validates the User name and Password for admin, admin
if (username.equals("admin") && password.equals("admin")) {
tv_Message.setText("Login Successful!");
} else {
tv_Message.setText("Login Unsuccessful!");
}
}
});
}
@Override
public boolean onCreateOptionsMenu(Menu menu) {
// Inflate the menu; this adds items to the action bar if it is present.
getMenuInflater().inflate(R.menu.login, menu);
return true;
}
}
Now run the application.
This is my first post on my new blog "Android for Beginners". The reason behind creating this blog is to help the beginners in the android development. I have just started learning Android and know what the problems beginners face.
Here is my first post: Say "Hello to the Android World!"
Before getting into the details, first we will create a simple application to say Hello World!. This is just a simple introductory example in which we will create and run one application. (We will get into the details in the up coming posts.)
A. Installation (Windows):
1. Install Java Development Kit.
2. Download the Android SDK. (http://developer.android.com/sdk/index.html)
3. Unzip the downloaded file. There two folders namely eclipse and sdk and one file namely SDK Manager.
4. Open the eclipse folder. Double click on the eclipse.exe file. Select the required workspace or if you want keep the default one.
You will see the window similar as below:
B. Application Development:
1. Go File --> New --> Android Application Development.
Give the proper values for the Application Name, Project Name, Package Name. Set the minimum required SDK, Target SDK, Compile with and Theme as stated in the above image. Always set the target SDK to the latest available.
2. Click Next.
Browse the location where you want to save the project.
3. Click Next.
Here you can set the launcher icon. You can select an Image from your machine or you can create your own icon.
4. Click Next.
Here you will specify the activity. This time select the Blank Activity.
5. Click Next.
Specify the Activity Name i.e. the Java class, Layout Name i.e XML file and Navigation Type to None. Click Finish.
6. You will find something like this:
Now go to the Package Explorer, Right click on the project i.e. HelloWorldApp. Select Run As --> Android Application. You will be prompted with the following message,
The above mentioned window is displayed because we haven't specified the compatible target yet. To do this click No. You will be prompted with the following window:
Close the Window.
Go to Window --> Android Virtual Device Manager.
Click New.
Specify the details as mentioned in the above mentioned image. You can specify whatever name you want in the AVD Name. Click OK. It will take some time to set.
Close the window.
Again go to Package Explorer. Right click on your project. Go to Run As --> Run Configurations...
Go to Android Application --> HelloWorldApp --> Target --> Select Automatically pick compatible device: Always uses preferred AVD if set below, launches on compatible device/AVD otherwise.
Select AVD_1 --> Click Apply -- Click Run.
Your application will run in the emulator: