In this post, I will create a simple Login application. This post will give you a brief idea about how to develop an application which handles user interactions.
User will enter login credentials and after validating the application will generate a message. The username and password will be validated against constant values "admin" and "admin".
Let's start with this:
As discussed in the first post, create one Application with the following details:


You will notice different windows like Package Explorer, Pallet, Outline, Console, LogCat etc. These are very important things to notice while developing an android application
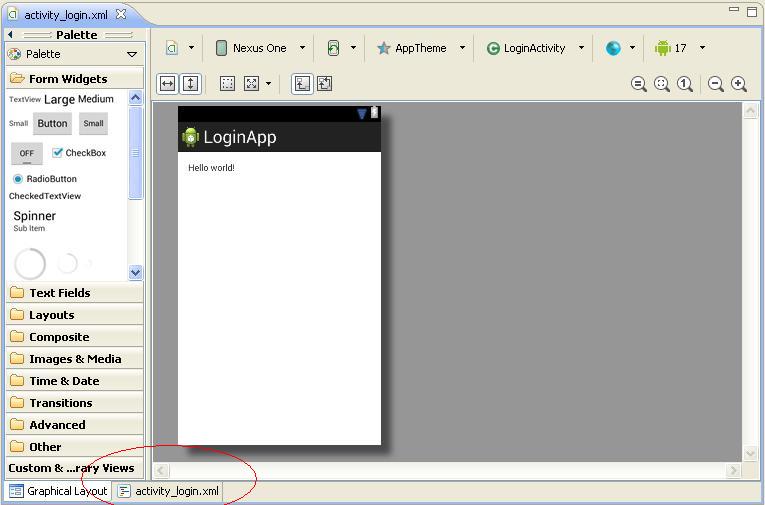
Take a look at Palette. There are few sections like Form Widgets, Text Fields, Layouts and more.
Each section contains different components which can be used to create user interfaces.
Going back to our application, you will notice "Hello world!" text on our app window (similar to the example in the first post). It is a TextView. It used to display a static text just like labels.
Delete the TextView.
There are two tabs: Graphical Layout and activity_login.xml.
Open activity_login.xml. You will find XML code which contains RelativeLayout.

Now, again go back to Graphical Layout, go to Form Widgets and drag one TextView on to the UI.

You will be prompted with the following window:

Select New String...

Click OK. You will get a new String which will be used to display in our TextView.
Click OK on the Resource Chooser window.
Right click on the "Username" TextView. Select Edit ID... Give the desired name to the TextiVew. I have given the name as tv_Username.
Drag an Edit Text from the Palette's Text Fields section. If you see, there are different types of edit texts available. Drag the one which is highlighted in below image.

Similarly set the text (blank) and id properties.
Now add one more TextView and EditText. This time select the Password edit text instead of normal one form the Palette's Text Fields section.
Add Button from the Form widgets section. Set its ID and text properties.


activity_login.xml
<RelativeLayout xmlns:android="http://schemas.android.com/apk/res/android"
xmlns:tools="http://schemas.android.com/tools"
android:layout_width="match_parent"
android:layout_height="match_parent"
android:paddingBottom="@dimen/activity_vertical_margin"
android:paddingLeft="@dimen/activity_horizontal_margin"
android:paddingRight="@dimen/activity_horizontal_margin"
android:paddingTop="@dimen/activity_vertical_margin"
tools:context=".LoginActivity" >
<TextView
android:id="@+id/tv_Username"
android:layout_width="wrap_content"
android:layout_height="wrap_content"
android:layout_alignParentLeft="true"
android:layout_alignParentTop="true"
android:layout_marginLeft="18dp"
android:layout_marginTop="15dp"
android:text="@string/username_text" />
<EditText
android:id="@+id/et_Username"
android:layout_width="wrap_content"
android:layout_height="wrap_content"
android:layout_alignBaseline="@+id/tv_Username"
android:layout_alignBottom="@+id/tv_Username"
android:layout_marginLeft="30dp"
android:layout_toRightOf="@+id/tv_Username"
android:ems="10" >
<requestFocus />
</EditText>
<TextView
android:id="@+id/tv_Password"
android:layout_width="wrap_content"
android:layout_height="wrap_content"
android:layout_alignLeft="@+id/tv_Username"
android:layout_below="@+id/et_Username"
android:layout_marginTop="47dp"
android:text="@string/password_text" />
<EditText
android:id="@+id/et_Password"
android:layout_width="wrap_content"
android:layout_height="wrap_content"
android:layout_alignBaseline="@+id/tv_Password"
android:layout_alignBottom="@+id/tv_Password"
android:layout_alignLeft="@+id/et_Username"
android:ems="10"
android:inputType="textPassword" />
<Button
android:id="@+id/bt_SignIn"
android:layout_width="wrap_content"
android:layout_height="wrap_content"
android:layout_alignRight="@+id/et_Password"
android:layout_below="@+id/et_Password"
android:layout_marginTop="34dp"
android:text="@string/signin_text" />
</RelativeLayout>
Go to Package explorer --> Expand the LoginApp --> src --> Package 'com.samples.loginapp' --> Open LoginActivity.java
Type the following code:
package com.samples.loginapp;
import android.os.Bundle;
import android.app.Activity;
import android.view.Menu;
import android.view.View;
import android.view.View.OnClickListener;
import android.widget.Button;
import android.widget.EditText;
import android.widget.TextView;
public class LoginActivity extends Activity {
// User name
private EditText et_Username;
// Password
private EditText et_Password;
// Sign In
private Button bt_SignIn;
// Message
private TextView tv_Message;
@Override
protected void onCreate(Bundle savedInstanceState) {
super.onCreate(savedInstanceState);
setContentView(R.layout.activity_login);
// Initialization
et_Username = (EditText) findViewById(R.id.et_Username);
et_Password = (EditText) findViewById(R.id.et_Password);
bt_SignIn = (Button) findViewById(R.id.bt_SignIn);
tv_Message = (TextView) findViewById(R.id.tv_Message);
bt_SignIn.setOnClickListener(new OnClickListener() {
@Override
public void onClick(View view) {
// Stores User name
String username = String.valueOf(et_Username.getText());
// Stores Password
String password = String.valueOf(et_Password.getText());
// Validates the User name and Password for admin, admin
if (username.equals("admin") && password.equals("admin")) {
tv_Message.setText("Login Successful!");
} else {
tv_Message.setText("Login Unsuccessful!");
}
}
});
}
@Override
public boolean onCreateOptionsMenu(Menu menu) {
// Inflate the menu; this adds items to the action bar if it is present.
getMenuInflater().inflate(R.menu.login, menu);
return true;
}
}
Now run the application.

It's written very very simply and sweetly.
ReplyDeleteThanks it helped me out.
what about a HTTP Post login?
ReplyDeleteThanks...
ReplyDeletehi
ReplyDeleteHi I am new to android... App is successfully installed in VM but "unfortunately stopped message" came while running.
ReplyDeleteThanks in advance
your code is very simple to understand.
ReplyDeleteMy Dealersocket Login
Thanks for sharing this post with us.
ReplyDeleteDealersocket Login Software
thank you.
ReplyDeletethis application is very useful for every users
ReplyDeleteDealersocket Login App
Thank you Sir...
ReplyDeleteThank you sir...
ReplyDeleteif username correct must go next app screen
ReplyDeletehow to do tat
Nic code
ReplyDeleteThis comment has been removed by the author.
ReplyDeleteThanks for sharing this Information.
ReplyDeleteAndroid Training in Noida
Nice Blog.....thanks for this.... Just visit App in Minute can create Application and website without burden. App In Minute has the affordable Pricing and Making Plan by App In Minute of Rs. 5 / Day (Rs.1825/ Year.) It can be develop your free android application , website product and service to the world. for more information about how to create an app
ReplyDeleteThis is such a great resource that you are providing and you give it away for free. cyberflix tv firestick
ReplyDeleteIt’s great to come across a blog every once in a while that isn’t the same out of date rehashed material. Fantastic read.
ReplyDeleteDevops Course Training in Chennai |Best Devops Training Institute in Chennai
Selenium Course Training in Chennai |Best Selenium Training Institute in Chennai
Java Course Training in Chennai | Best Java Training Institute in Chennai
Latest Extratorrent Proxy site list
ReplyDeleteTrail Cams Best buy
FOrtcraft apk dwonload 2019
Would you like to read more about health fusion login then click here for more information
ReplyDelete"It was an informative post indeed. Now It's the time to make the switch to solar power,
ReplyDeletecontact us(National Solar Company) today to learn more about how solar power works.
solar panels
solar inverter
solar batteries
solar panels adelaide
best solar panels
solar power
battery storage solar
battery charger solar
solar regulators
solar charge controllers
solar battery storage
instyle solar
solar panels melbourne
solar panels for sale
solar battery charger
solar panels cost
buy solar panels"
"Bruce Caplan is a Licensed Insolvency Trustee with over 25 years of experience helping people and companies
ReplyDeletesolve their debt problems.
Winnipeg Consumer Proposal
Consumer Proposal Winnipeg
Bankruptcy Winnipeg
Insolvency Winnipeg
Winnipeg Bankruptcy
consumer proposal
Winnipeg Insolvency
Winnipeg Insolvency Trustee
Insolvency Trustee Winnipeg
Bankruptcy
Winnipeg Debt Consolidation
Credit Counselling Winnipeg
Debt Consolidation Winnipeg
Debt Consolidation loan"
trendyol indirim kodu
ReplyDeletecami avizesi
cami avizeleri
avize cami
no deposit bonus forex 2021
takipçi satın al
takipçi satın al
takipçi satın al
takipcialdim.com/tiktok-takipci-satin-al/
instagram beğeni satın al
instagram beğeni satın al
btcturk
tiktok izlenme satın al
sms onay
youtube izlenme satın al
no deposit bonus forex 2021
tiktok jeton hilesi
tiktok beğeni satın al
binance
takipçi satın al
uc satın al
sms onay
sms onay
tiktok takipçi satın al
tiktok beğeni satın al
twitter takipçi satın al
trend topic satın al
youtube abone satın al
instagram beğeni satın al
tiktok beğeni satın al
twitter takipçi satın al
trend topic satın al
youtube abone satın al
takipcialdim.com/instagram-begeni-satin-al/
perde modelleri
instagram takipçi satın al
instagram takipçi satın al
takipçi satın al
instagram takipçi satın al
betboo
marsbahis
Nice blog
ReplyDeleteONLEI Technologies Internship
Python Internship
Data Science Internship
Machine Learning Internship
Digital Marketing Internship
Android App Development Internship
Manufacture your new product with these 5 stages of PRODUCT DEVELOPMENT. They are one of the best method to develop a user-friendly product which can maximize your revenue.
ReplyDeleteMMORPG OYUNLAR
ReplyDeleteİnstagram Takipci Satın Al
tiktok jeton hilesi
TİKTOK JETON HİLESİ
antalya saç ekimi
ınstagram takipci satın al
instagram takipçi satın al
Metin Pvp
Takipçi satın al
perde modelleri
ReplyDeleteSms onay
Turkcell Mobil Ödeme Bozdurma
nft nasıl alinir
ankara evden eve nakliyat
trafik sigortasi
dedektör
Site kurma
aşk kitapları
Smm panel
ReplyDeletesmm panel
iş ilanları
İnstagram Takipçi Satın Al
hirdavatciburada.com
beyazesyateknikservisi.com.tr
servis
Tiktok Jeton Hilesi İndir
Really informative post and perfect for new comers in the industry.
ReplyDeleteJoin now Digital Marketing Training in Delhi in Online Summer Training.
Data Analytics Training In Noida
SAP Online Training
SAP FICO Training in Delhi
MERN Stack Training in Noida
Revit Architecture Training In Delhi
ANSYS Online Training
Django Online Training
Machine Learning Online Training
This comment has been removed by the author.
ReplyDeleteGreat blog The content is informative and engaging. The author's writing style is captivating.Visit my website to get best Information About SAP HR Training in Noida and mention Below Technologies.
ReplyDeleteSAP HR Training in Noida
This comment has been removed by the author.
ReplyDelete